It’s Not Quite Looking Enough Like Christmas

Christy Copics, Glitter Ritz, Ink & Paper 12 Comments

I have a Christmas card to show you today. This one’s been in the works for about two and a half days. At this rate, I should have my cards done by mid-February.

There are a couple things I love about this card. First, I think I finally got the hang of coloring on glitter with copics. The blends in this one are so much more smooth. I also love the background, which I made with metal from Ten Seconds Studio and a Tim Holtz embossing folder.

I don’t love the edging, I think the glitter is too much, and I didn’t have a steady enough hand with it. Oh well, lessons for next time.

Materials:
Ten Seconds Studio metal – Apple Green
Red cardstock from my stash
Neenha 80lb white cardstock
Elizabeth Craft Designs peel-off sticker – Christmas trees number 2472
Glitter Ritz – Purple Highlight and Stardust
Ranger Glossy Accents
Copic Markers: R27, G28, G82

Other supplies:
Martha Stewart edge punch
Tim Holtz Alterations embossing folder for Sizzix
Sizzic Big Kick
EK Success craft mat and razor blade
Glue Glider

Pioneer Photo Squares

And, just for fun, there’s a sleepy puppy picture after the jump.

How sweet is that? She likes to hang out with me while I work.

Scrapbook Planning

Christy Ink & Paper 11 Comments

My sister and I went to Ireland together back in–actually, I’m not going to tell you when we went. Suffice it to say it was long ago. I finally got my butt in gear and decided to start the scrapbook. I’ve been thinking about this scrapbook for…as long as I’ve been back from Ireland (you thought you had me there, didn’t you?).

With my bag of scraps and travel journal.

My first step is culling pictures. We came home from this trip with over 1000 pics between us (digital cameras are a blessing and a curse). From there I narrowed it down to about 150 that I printed. It always helps to to have physical prints of the pictures in hand before I start a layout. I’ll probably cut this list by half by the time I’m finished, but it’s worth the few extra bucks to me to do it this way. I’ll also end up printing at least a few more pictures as I realize I have “holes” in the scrapbook.

I split my pictures into piles based on events/locations/days/whatever goes with the particular scrapbook I’m designing. For this I split the pictures into places we visited. The big stack is from Blarney Castle. That could probably be its own book.

This exercise is best done when the puppy isn’t home.

After I organize my pictures, I start to organize my scraps – you know, tickets, pamphlets, post cards–all the stuff you acquire over the course of a vacation/school year/whathaveyou.

Once done I combine all the scraps and photos in file folders. This way I know I can work on one folder at a time and not forget anything. File folders are great for this because they can be tucked in a desk drawer until I’m ready for them…which could be years.

This trip was long ago enough that I’ve since developed a new way of keeping track of my scraps. Now whenever I go somewhere I bring with me an accordion file jacket that zips shut. I use each section for a different day/location/event. Then I don’t have to spread my scraps all over the floor, I can just transfer them to file folders or keep them in the jacket. Currently, my file jacket is filled with scraps from my honeymoon…which I was on exactly a year ago. So that will give you some idea of how behind I am.

And that’s it. What? You didn’t think after all that I was actually going to get to a layout today, did you?

Redeeming Myself

Christy Copics, Ink & Paper 8 Comments

As ridiculous as it sounds, I was embarrassed enough by the poorly colored Christmas trees I posted yesterday that I wanted to post an example of my good work.

How silly is it to take pride in your coloring skills? I worked hard in kindergarten and want you to know it!

For my samples today I used these awesome stamps from LaLa Land Crafts. I just love them. Seriously, these are my favorite character stamps. I know everyone loves Tilda images from Magnolia, and it’s a great line, but I think LaLa is so much cuter.

LaLa Land’s owner, Irina, was my Copic instructor. She teaches at one of my favorite local scrapbooking stores, and she’s amazing. I’ve already taken 3 of her classes, and am planning to take 2 more.

I colored Sitting Pretty Rosie and Sitting LaLa. When I color samples I like to stamp off at least two of each image: one for practice and one for serious. You will notice that the left-hand image on both of these is the practice. They’re messy because I use them to test color combinations and blending styles, sometimes on top of each other.

Let’s start with LaLa.

V01, 12, 15 and 17 is one of my go-to color combinations for clothes, so they were a natural choice when I went to color in the jumper. But, when I decided to use cool grays for the shirt and tights, I liked it so much that I changed everything. It’s easy not to think of the grays as colors, but I really like how it turned out. I used C1, 3 and 5, and in the second image I used R20 and R32 for the shoes, shirt and headband.

The hair gave me some trouble the first time around. I started by combining E59 with E35 and 31, because I didn’t think 37 was dark enough or 55 was light enough. It ended up being a mistake, and came out very streaky. After I layered on some E55 it evened out some, but I still don’t love it. Gray dress LaLa’s hair was done with E31, 35 and 37, which turned out to be plenty dark enough. I really like the softer, richer look. Purple dress LaLa’s hair is dull in comparison.

Rosie’s hair gave me just as much trouble.

Wanting to go blonde for her, I chose YR31 as the base color. In my first attempt I tried to feather blend all of her hair. This didn’t work out so well, mostly because the bottom left portion is too large and oddly shaped. I also used too many layers of YR31 before I switched to Y26 for darker accents. It just ended up looking splotchy, so I tried to smooth it with YR00. Mistake. For the second image I colored all her hair with an even layer of YR31. Then I feather blended in an extra layer at her part, behind her ears, and behind her head/neck, which would be natural shadow areas. Finally I did a few sweeps of Y26 in those same shadow areas and went back over with YR31 to blend. I’m much happier with it this way.

Her dress was equally challenging. The image makes me think of a little girl sitting out in the sunshine, so I wanted to give her a bright, fun dress. What better color than hot pink? I love the shades of RV02, 04 and 06, but for some reason I find they don’t blend as well as other color families. RV02 actually slightly changes the tone of 04 and 06 when layered on top. You can’t tell asĀ  much here because I went back over it with 04, but it looked almost as though I’d been using the colorless blender on the first dress. Anyway, I decided to use RV04 almost exclusively, and feather blended it over the entire dress. The slight tone change is from layering, though there is a hint of RV06 at the shoulders and knee.

Oh, on both girls I used E21, E41 and E000 for skin. This is slightly deceptive, but E21 is actually the darkest color here, which I used for shadows. E000 is the main color, and E41 was used for blending.

Can you tell that I’m obsessed?

Play Time: A Glitter Ritz Tutorial

Christy Glitter Ritz, Tutorials 11 Comments

My favorite part of crafting is picking up new toys and learning new techniques. And Christmas, of course, is a great time to take advantage of all the possibilities. I made the decision a few weeks ago to hand-make all my Christmas cards this year. This will no doubt be a blessing and a curse. I’m not even going to pretend there’s a possibility I’ll be saving money on this little venture.

Anyway, I mentioned in my first post that on Saturday I attended a demo featuring Peel-Offs stickers and Glitter Ritz Microfine glitters.

Well of course I had to try it for myself.

So off I went to buy myself a roll of double-sided adhesive, a few sheets of peel-offs, and 6 pots of glitter. Again, I’ll say, Christmas is a great time to try new things. When you’re starting a collection of something that comes in tons of colors, it’s nice to know you need red, green, blue, silver and gold. That doesn’t mean I didn’t still spend 20 minutes deciding which shades of red, green, blue, silver and gold I needed. My sixth glitter was highlight, which is transparent for layering over images and colored papers.

My first experiment of course had to include my other love: my Copics. So, I glittered up this little piece of cardstock and colored away.

Splotchy McSplotchness

A word to the wise about demos: it’s never as easy as they make it look. Copics obviously aren’t going to work the same on glitter as they do on your Neenah or Bazzil papers. The first tree, especially, is a mess. But hey, that just means I need more practice, and I certainly don’t mind doing that!

Experiment two was much simpler and much more successful. I cut out this cute “Noel” die on a piece of paper that already had adhesive applied. Then, using my razor blade, I removed the backing and applied the glitter one letter at a time. It came out great! I may even deem this one worthy of going on one of my Christmas cards.

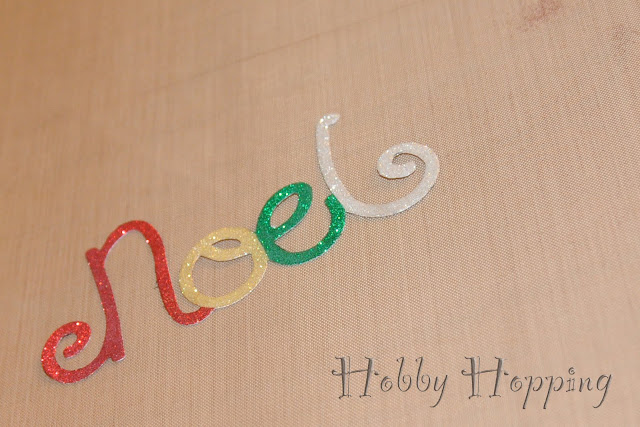
The camera doesn’t do justice to the sparkles

But wait, there’s more! One thing I learned at the demo was never to throw anything away–not even the backing to the adhesive. While this doesn’t bode well for my husband’s suspicions that I’m a hoarder in training, it opens a whole new world of possibilities for my crafts. Using the backing from the “negative” portion of the die cut, I created a mask and made this little guy. The pictures don’t do it justice, but you wouldn’t believe the clarity of the lines between the letters and the background. Something like this would make a great simple card.

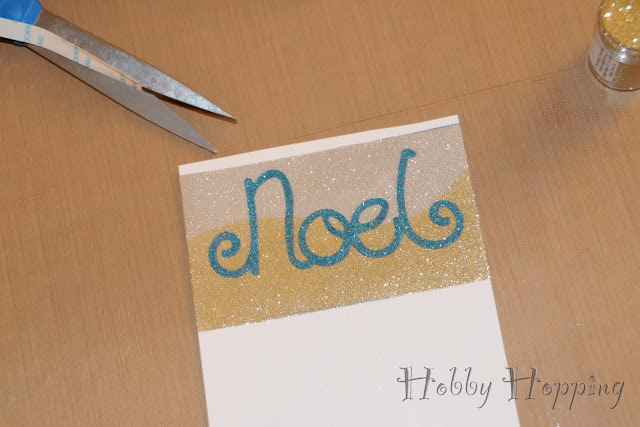
You can’t really see it, but my mat is COVERED in glitter. So are my pants, my hands, and probably my dog.

So, there you have it. Two wins and a fail, but I’ll take it. I’ll be washing glitter off of myself and everything I own for weeks, but I think it’s worth it.

Alright, I’m putting in a jump because this is so long. If you want semi-step-by-step instructions for any of the above, continue on. As a bonus, you get to see how my work space gets messier and messier as I go.


Peel Off Christmas Trees

Affix the double-sided adhesive to a sheet of cardstock.

Place the peel-offs sticky side up on a nonstick surface. (Note: I’m using the Inksentials non-stick craft mat. This actually is not an ideal surface as the adhesive stuck a little. The best thing to use is the backing to the adhesive, but since this was my first project, I had none available.)

Peel the backing of the adhesive/cardstock and lay on top of the stickers so that they are on top of the double sided adhesive. Cover the entire card with Highlight Glitter Ritz.

It’s important to put the stickers on before the glitter so that there’s a tight seal between sticker and cardstock, otherwise the Copic ink will bleed through.

“Burnish” the glitter by rubbing a finger all over the surface of the cardstock. This makes sure all the glitter sticks better and gives you a shinier surface. Color with Copics and voila!

Noel Die Cut

Apply adhesive to cardstock and run through die cutting machine.

Using fine tipped scissors or a razor blade to cut the backing, reveal adhesive on just one letter and apply glitter. Burnish.

Repeat for each letter, using a different color each time.

Noel Mask

Apply a new section of adhesive to the cardstock, and remove backing from both sections. I made this picture large because it’s difficult to see, but negative portion of the backing from the Noel die reveals a sticky Noel on the new section of adhesive.

Apply glitter and brush off excess. Remove mask to reveal sticky background.

I applied an additional mask with a wavy edge to create a two-toned background.

Enjoy!

Just for Sh*ts…

Christy Ink & Paper 17 Comments

My brother-in-law and soon-to-be sister-in-law live in Texas. Back when we all lived in DC we would hang out all the time, but we haven’t seen each other since our wedding a little over a year ago.

So, my husband and I decided to send them a card. It’s sort of weird to send a card for no reason, and all the “Just a note” and “Just saying hello” cards out there seemed trite.

Then. I had an idea.

I am full of…great ideas.

There are two things that make this card perfect for them:

1. My husband and I got a puppy at Christmas last year (her name is Herbert). A few months later, my in-laws also got a puppy named Ellie. We’re always texting each other pictures of the dogs, and there’s an ongoing battle over whose dog is cuter (ours, obviously).

2. My brother-in-law, like many grown men, has the sense of humor of a 12-year-old boy. Poop jokes, to him, are the epitome of comedy.

It’s a pretty simple card, but I’m really happy with the way it turned out. My husband likes it so much he thinks I should create a whole line of “sh*tty cards.” I’m not so sure about that.

You should have seen all the practice poop I drew. It was a low point.

Materials:
Brown, white and yellow cardstock – from my extensive stash, I regrettably do not know the brands or color names.
Hero Arts stamp – Big Dog, number F5299
Sizzix Wingo Zingo Alphabet – Sizzlits decorative strip number 654900
Hand-drawn poop – surprisingly, there aren’t a lot of poop stamps out there.
EK Success 3D Dots
Copic Sketch markers – E59, E37 and E35 for poop, YG93 and YG97 for grass.

Other supplies:
Sizzix Big Kick
Martha Stewart Crafts Scoring Board
EK Success cutting mat and razor blade
Fiskars rotary paper trimmer

Obsessions: A Non-Exhaustive List

Christy Uncategorized 27 Comments

Generally speaking, if it’s a craft, I want to do it. If it’s a craft that requires tons of equipment, I want to do it harder. Here, I will attempt to keep a running list of the things I especially enjoy. I fully expect it to grow and change over time.


Crocheting – I love making tiny baby hats. The tinier, the better. I would love to make a nice cozy blanket. Maybe a winter project.

Knitting – Sometimes I knit tiny baby hats. I don’t knit much else though. I’ve been wanting to attempt a sweater, but truth be told, I’m skeered.

Copic Markers – I want them ALL. They are so easy to use and who doesn’t love to color?

Peel-Off Stickers and Glitter Ritz – Ohmigod. My local craft store just had a demo with Els van de Burgt. The possibilities are endless; the website doesn’t even show half of what you can do. I’m in love.

Ten Seconds Studio Metal Embossing – Again with the endless possibilities. These sheets of malleable metal can be cut, crumpled, embossed, sanded, you name it. So much fun.

Iris Folding – An extremely simple papercraft that looks so complex. It makes the prettiest cards.

Writing – This is my third blog. The other two are about homebrewing (maybe I should add that to the list), and advice. I may or may not also be attempting to write a novel or two.

Homebrewing – One of these days, I’ll make a beer that really tastes like beer. I get closer with every batch.

Cooking – I’m a mess in the kitchen, actually, but I still like to try.

Cake Decorating – Remember when I said the more supplies required for a hobby the more I want to do it? Yeah.