Keeping Promises

Christy Ink & Paper 9 Comments

I told you today I’d have scrapbook pages to show off! Here are two pages from our morning at Blarney Castle. There will be at least two more. We had so much fun there and took a ton of pictures!

The foam shamrocks will have to be used on some future page…

It’s not my best work, but after this amount of time, something is certainly better than nothing.

The background paper is plain white cardstock colored with Distress Ink (Peeled Paint) and stamped with some old, poor quality stamps from my stash. I should have left well enough alone and skipped the stamping, but oh well.

The large picture of the castle was cut out from a poster. All the other pictures were originally 4×6 prints. I find it easier to cut standard prints than to specially print each picture in the size needed (but I’ve been known to do both).

Between the wet Irish weather and fact that my flat iron was fried on the first day of the trip, the whole album is going to be a study in bad hair days. But hey, that’s what memories are, right?

And now, I have to go. The other promise I made today was to go to the grocery store. Not sure if that one’s going to be kept.

Iris Folding

Christy Ink & Paper 11 Comments

Sorry for the late post today. I went up to the city to meet some old friends for dinner, and didn’t get my pictures edited before I left. Eating is a hobby too, though, right?

So, I know it’s been all Christmas all the time around here, and I’m getting tired of it, too. It’s not even October yet! (Though it will be by the time most of you read this.) I just want you all to know I understand, and I fully intend to change that…soon.

My intent for today was to show off some of the progress I’ve made on the Ireland scrapbook. But to be honest, there’s not much progress to be shown. And then, when I sat down to actually knock out a few pages I got distracted by iris folding and made this instead.

What is it? Nothing, really. I guess you can call it a prototype for some future card. I make a lot of prototypes. Sometimes making the elements that will go on the card is more fun than making the card itself, you know?

I like this tree for the most part. The pattern is fun and the colors work well together. But I didn’t do a fabulous job of cutting the frame, and the white cardstock is too plain. There’s still a lot of playing around to do before this will be usable.

Anyway, if you’ve never tried iris folding before, it’s a really fun, easy craft. If you can fold paper, count, and work a tape dispenser, you can iris fold. I drew this template myself, which added about 15 minutes to the whole process, but you can get free ones from the google.

No, I didn’t clean my desk today. What are you gonna do about it?

All you need is the cutout frame and the drawing. Just stick the cutout over the drawing (I use post-its to hold it in place) and tape your folded strips of paper down along the lines. Easy as pie!

You want to use thin paper for this, otherwise it gets very bulky very fast.

So that’s what I accomplished today. I swear, though, Ireland scrapbook tomorrow. Really. Probably.

Oh, and as an apology for the incredibly lame post tonight, I give you curious doggy pictures after the jump:

Oh Herbert, you’re the cutest 70lb girl puppy with a boy’s name ever!

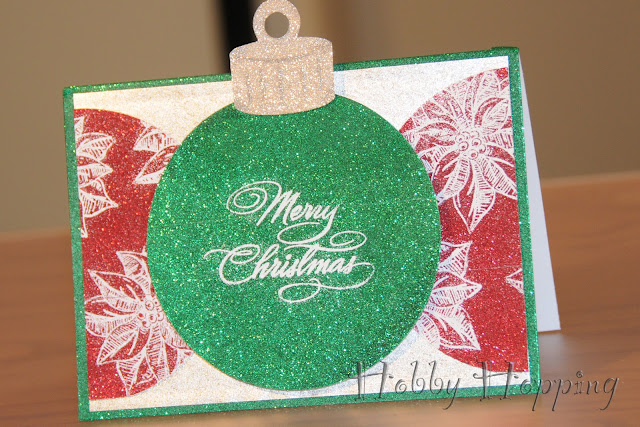
Merry and Bright Card

Christy Glitter Ritz, Ink & Paper 11 Comments

The design for this card came from CPS #186. 

The large ornament die was just made for this sketch. And as you can see, I got to play with my favorite thing: Glitter Ritz!

I also entered this card in The Crafty Pad’s Challenge 90: Christmas Sparkle. It certainly fits, right?

The sentiment and poinsettias are heat embossed over the glitter! This takes a little extra time, because you have to use a really fine brush to get the excess embossing powder off of the glitter, but the results are worth it, I think.

I also used Copics to add a little dimension to the top and some light shadowing to the main ornament. The shadows only show up when the light hits it just so.

You’ll be seeing a lot more cards like this. The messiest crafts are always the most fun!

Materials:
Paper: Staples cardstock and silver oragami paper
Sizzix Die: Ornament, Ball
Glitter: Glitter Ritz Stardust, Regal Red, and Emerald Green
Stamps: Stampabilities Vintage Poinsettia, I don’t remember where I got the Merry Christmas sentiment
Embossing Powder: Stampendous Detail White
Copics: C3, C5
Adhesives: Glue Glider Pro (High Tac), Sookwang double sided tape, Scotch double sided tape, EK Success 3D Dots

Other Equipment:
Heat Embosser: Marvy Uchida
Sizzix Big Kick
Fiskars Rotary Paper Trimmer

New Toy Tuesday: Christmas Dies

Christy New Toy Tuesday 9 Comments

Tuesday is laundry day at here at the hobby hop house. That means most of my day is dedicated to things that are decidedly un-hobbyish. Of course, what that doesn’t mean is that I don’t still need some kind of daytime craft fix. So I thought, from now on, instead of doing crafts on Tuesdays, I’d just write about craft supplies.

Let’s face it. We hobbyists are, first and foremost, collectors of stuff. I’m quickly running out of space in my makeshift office/craft room. Soon, my husband’s obsolete CD and DVD collection is going to have to find a new home. Honestly, if I only post once a week about my new stuff, I’m only going to be able to cover about a 5th of the new stuff I get. You think I’m kidding.

So today, I’m faced with the decision of what to show you on the inaugural New Toy Tuesday.

And then, what to my wondering eyes should appear, but the UPS man, with a box full of cheer!

I debated for a long time over whether or not to buy these dies. You see, I’m dying–dying, I tell you–to get a Pazzles electronic cutting system. Maybe, if I’m very good this year, I will be able to showcase it for you on the New Toy Tuesday After Christmas (hint, hint!). Anyway, given my current Pazzles aspirations, I’ve all but stopped purchasing new Sizzix dies (embossing folders, however, are a different story). Eventually, one major factor helped me make up my mind: I don’t plan (hope) to get my phantom Pazzles until Christmas. Meanwhile, I need to cut out Christmas ornaments for my Christmas cards, which have to go out before Christmas, which would be before I get my Pazzles.

So I ordered these babies from the Sizzix Outlet, where shipping is more expensive than the dies themselves (but it’s okay, because the total is still way cheaper than what you pay in stores).

Bigz dies are actually just barely larger than Originals dies. I prefer these thicker dies to Sizzlits because you don’t need to deal with the multi-purpose platform, and because the extra cushioning allows you to cut several sheets without warping the paper.

And heck, who am I kidding. I couldn’t let the day go by without trying them out, could I? Here’s a little preview of what will be going on the cards I make tomorrow.

Paper Ornament Tutorial

Christy Ink & Paper, Tutorials 11 Comments

A couple people asked me how I made the ornament I posted yesterday, so I thought I’d do a little how-to. It’s harder to explain than it is to do, so hopefully I won’t leave you too confused. If you have any questions, leave them in comments.

Cut out 20 circles of equal size from various papers. For this example, I used 5 coordinating patterns. Yours can be all the same, all different, or any combination. The size of your circles will determine the size of your ornament. I used the largest circle on the Circles #2 die from Sizzix for circles exactly 2.5 inches in diameter, and my ornament is slightly larger than a softball.


Decorate your circles. For today’s ornament, I liked the paper so much I wanted it to speak for itself. You can do whatever you want, though. Yesterday I sanded some, embossed some, used distress inks, stamps, glitter, and all kinds of embellishments. It’s a fun way to do a little bit of everything.

Fold the circles into triangles. This is the hardest part, because you want very straight folds and very even triangles. I made a triangle template to help me along. This required a lot of trial and error and a little math. Had I been better at trigonometry, it would have taken a little more math and a lot less trial and error. (Note to teenagers: this is one of those times you’ll need to know how to solve for x in real life. Stay in school.)

Using my template, I found that for a circle with a 2.5 inch diameter, I could place the circle in the upper left corner of my scoring board and score at the 1 7/8 inch line 3 times to get my perfect triangle.

Here you can almost see my first two score lines, and how this is lined up for the last score.

Lay out your circle-triangles in the order you want to put them together. The sphere is basically made up of 4 rows of 5 triangles. Since I used 5 paper patterns, I set them up so I had one of each pattern in every row. This way you can easily see which edges will get glued together.

The triangles in row one all point up. These points will meet in the middle when glued together, and you’ll have the top of the sphere.

Row two points down. The tops of these will meet the bottoms of the first row.

Row three points up. They will be placed in between the triangles in row two.

Row four points down. Like row one, the points of these triangles will meet in the middle to form the bottom of the sphere.

Start Gluing. I glued the circles from the first row to the circles in the second row to make 5 diamonds.

Next I glued the first row together, so that half of the sphere was completed. You can see how it looks like a pentagon with a triangle hanging off each side.

Then I glued row three in between the protruding triangles, and finished by adding the top/bottom/whatever.

Note: For the ornament I posted yesterday I used my Glue Glider. However, today I found that a good old-fashioned glue stick works much better. The glue stays wet long enough to slide the edges around until they match perfectly, and is still tacky enough to hold while you’re jostling the last couple pieces in.

Finally, before you put in that last piece, tape a loop of thread to the back of it. You want to be able to hang it, right?

Ta Da!

And that’s it! If you have any corner points that won’t stay together just add a dot of liquid glue and pinch them together for a few seconds until they hold. Enjoy!

My Mom Will Hate This

Christy Ink & Paper 2 Comments

Here’s another project I completed for Memories Live On.

The inspiration for this project was an art project I did in 5th or 6th grade. The original was made from circles cut out of Christmas cards, was about twice the size of this, and was, to be perfectly honest, ugly as sin. Projects completed in a 50 minute art period by an impatient child using school-issue safety scissors and Elmers glue typically are.

My mom had 5 of these ornaments. One of the few pitfalls of having a large family is that bad art projects come back at you five-fold. Being the loving, supportive mom that she was, she wouldn’t dream of throwing them away. But I saw her cringe every time one was hung on our tree.

So my goal was to re-create the ornament using better materials and a little bit of actual skill. The result may still not be worthy of a place on my mother’s tree, but I’ll quite proudly hang it on mine.

Materials:
Coredinations Cardstock: Fern and Satin Rose
Dear Lizzy + American Crafts Cardstock: Christmas Tidings & Tinsel
Dear Lizzy + American Crafts Stickers: Mittens Accents
Hero Arts Stamp: Traditional Snowflake D4798
Stampabilities Stamp: Vintage Poinsettia F1188
Stampendous Embossing Powder: Detail White DP100
Glitter Ritz Glitter: Stardust
Miscellaneous buttons and embellishments
Distress Ink: Peeled Paint and Fired Brick

Other Supplies:
Fiskars Rottary Paper Cutter
Martha Stewart Crafts Scoring Board
Sizzix Big Kick with Circles Die and Cuttlebug Swiss Dots embossing folder
Glue Glider: High Tac
Tsukineko Essential Glue Pad
Ink It Up Clear Embossing Pad
Marvy Uchida Embossing Heat Tool