


One more big thank you to everyone who voted for my “Castle Fit for Little Kings” in round two of SYTYC. I had such a good time making this, and hope the following tutorial brings you (and your little ones) lots of fun! Now let’s build sew ourselves a castle!

Step 1: Measure your table. To create each panel you’ll need to know the length, width, and height of the table you’re using. I made the castle to fit my dining room table, which measures 60 inches by 36 inches by 30 inches. But unless your table happens to be the exact same size as mine, my measurements won’t do you much good. (Note that this project works best on a rectangular table with relatively sharp corners.)

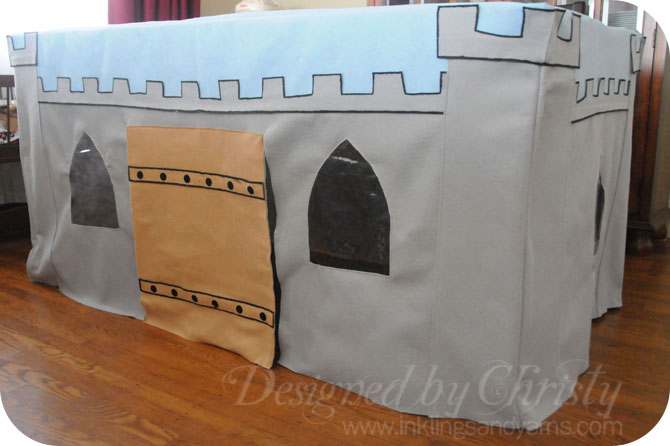
Step 2: Gather your materials. I used about 2 yards of gray felt, 2 yards of light blue felt, and 3/4 yard of brown felt (all 72 inches wide), plus an 18-inch length of velcro, 12 velcro dots, a Sharpie paint pen, and the plastic packaging from several curtains.
Step 3: Cut fabric. I’ve placed my measurements in red, but more importantly provided the general formula for you to create the design to your table’s specifications.
Light blue felt:
Top Panel: {length of table + seam allowance} x {width of table + seam allowance} – 61 x 37
Side Panels: 2 pieces {~1/5 height of table + seam allowance} x {length of table + seam allowance} – 7 x 61; 2 pieces {~1/5 height of table+ seam allowance} x {width of table + seam allowance} – 7 x 37
Gray felt:
Side panels: 2 pieces {~4/5 height of table} x {length of table + seam allowance} – 24 x 61; 2 pieces {~4/5 height of table} x {width of table + seam allowance} – 24 x 37
Turrets: 8 pieces {8 inches} x {height of table – 3 inches} – 8 x 27
Battlements: Cut several long strips 3 inches wide to be trimmed later.
Brown felt:
Door: {1/3 height of table} x {18 inches} – 20 x 18
Bolt strips: 2 pieces {18 inches} x {2 inches}

Step 4: Piece together side panels. Since felt is heavy and doesn’t fray, the panels are pieced using raw seams. All fabric pieces should be sewn with right sides up. Sew the light blue and gray side panel pieces together with 1/2 inch overlap. The result should be 2 panels 30.5 x 61 inches and 2 panels 30.5 x 37 inches.

Step 5: Battlements. With fabric scissors, cut the strips of gray felt into the shape of battlements, then outline around the edges with Sharpie paint pen. With fabric glue, affix the battlements over the seam between the gray and blue felt.
Step 6: Turrets. Place turrets on top of each panel so that outside edges align (see diagram above). Sew down with right sides facing up.

Step 7: Door. Position brown felt in the bottom center of one long panel. With right sides facing up, sew door piece around all 4 sides. Outline bolt strips with paint pen and glue to top and bottom of door. Glue velcro dots onto strips simulate bolts. Carefully cut up both sides of door and roll inward. At the point where the top row of velcro dots meets the fabric (on the inside of the castle), glue down velcro strip. This will allow the door to stay open when desired.

Step 8: Windows. I made a simple template with plain paper and used it to cut several windows (2 for the door panel, 1 for each side panel, 3 for the back panel). Then I carefully pinned them to the WRONG SIDE of each panel. Sewing them on was probably the most challenging part of this project. The clear plastic is rather sticky, and didn’t want to feed through my sewing machine. After a fair amount of unpicking, I finally came across a solution: the zipper foot! I just aligned the foot so it ran alongside the plastic without touching it, and it was smooth sailing from there on out. After sewing all the way around the window, turn to the right side of the panel and carefully cut away the felt inside the stitched area.
Step 9: Assembly. The end is near! Start by sewing each side panel to the top, right sides together. The wrong side of your top panel is the side you traced the shape of your table onto. Sew along that line and each panel should line up perfectly. I started by sewing the two long panels on, then the two short panels. Then I draped the whole thing over my table inside out, and pinned up the sides (right sides together). Sew the panels together from the top corner down to the bottom (if they don’t line up perfectly, it’s easier to trim the bottom than to deal with bunching at the top).

Step 10: Corner Battlements. The final touch is to add battlements to the turrets. Cut the remainder of your battlement strips so that they’re slightly wider than each turret (about 17-18 inches). Fold them down the middle and sew about 1/8th inch from the edge to get a nice hard corner, then glue them around the tops of each corner.

All done! It’s definitely a lot of work, but the result is so fun and more than worth the trouble! Remember tomorrow will be the start of my very first Linky Party, and I’d love to see the amazing things you all come up with!